I made a movie of the before & afters of Millie! She's all done and quite lovely!
Showing posts with label decorating on the cheap. Show all posts
Showing posts with label decorating on the cheap. Show all posts
Wednesday, September 4, 2013


Thursday, June 13, 2013
Summer Porch

I'm loving my front yard this summer! Things are coming together! I still have a couple of things I want to do, like replace my porch light, but all in all I *heart* it! Things have been crazy round our house, but I promise to share some recipes and crafty things soon!

The big "canisters" I planted flowers in were old metal food storage containers! I dumped the 40 year old food out (it was dated 1965) and painted them! I love the pastel colors and the size of them!
Friday, May 17, 2013
Vintage Tupperware Planters

I feel like a genius! These beautiful vintage Tupperware strainers make the BEST planters! The color is amazing, they already have drainage holes and they're Tupperware so they won't be ruined by water or being outside. Plus, they don't get hot like metal and they retain the moisture in the dirt well!

This small lavender strainer makes a fun planter too! I bought the flowers from the high school greenhouse. I had no idea that high schools raise and sell garden plants! Nina is in the plants & soil FFA science class this year (according to her, everyone else in the class are rednecks... haha) so I've had the chance to buy poinsettias, flowers and tomato plants from the school greenhouse. I have been crazy impressed with the quality of the plants. Even the carnation corsage she made in the class lasted three weeks in my fridge before I finally just threw it away. I think I'll keep buying from them in years to come.

Sunday, May 5, 2013
Fun New Projects with Chalk Paint and Chalkboard Paint

This is a cute little silverware project! I've been making homemade chalk paint (and chalkboard paint) and having lots of fun with it! These little cutting boards turned out adorable! They're cuter in real life too! Cutting boards and silverware can be found for super cheap at yard sales this time of year, so this is an inexpensive but really fun project! I simply painted the cutting boards, spray painted cheap silverware and glued the two together!


If you can't tell, I'm really into the vintage light blues/teals at the moment... Of course those colors don't really match my house, but that's the beauty of selling the things I make! I get to paint the pretty colors and don't have to find a place for the items.
For chalk BOARD paint, as in, you can write on the project with chalk, you stir about 2TBSP unsanded grout powder into like a half cup of whatever paint your heart so desires. I bought my grout at Home Depot for about $5 for a small tub. It totally works! I like to do several coats to make sure it really sticks. I even painted an old metal pizza pan with chalkboard paint for Alyssa's room and it turned out fabulously!

Thursday, April 18, 2013
Sugar Sack Dresser
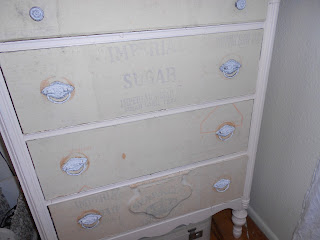
I have a total obsession with sugar sacks. I own several and I've done a few small projects with them. I was given an old dresser and decided to make it over with some of my sugar sack stash. It was my first "big" sugar sack project and it turned out fabulously! I don't know why I haven't blogged this before!


The old wood dresser was pretty but not really my style. It was crying out for a makeover!

The sugar sacks were easy to apply with full strength liquid starch. I've been using the dresser for a year now and it still looks as good as the day I made it over. The liquid starch works like magic. The whole project cost like $5, including the dresser since it was free! The possibilities of fabric and liquid starch are endless! You could do a whole wall if you wanted! If you ever want to take the fabric off, soaking it in warm water should do it! How cool is that?


The old wood dresser was pretty but not really my style. It was crying out for a makeover!

The sugar sacks were easy to apply with full strength liquid starch. I've been using the dresser for a year now and it still looks as good as the day I made it over. The liquid starch works like magic. The whole project cost like $5, including the dresser since it was free! The possibilities of fabric and liquid starch are endless! You could do a whole wall if you wanted! If you ever want to take the fabric off, soaking it in warm water should do it! How cool is that?

Friday, September 21, 2012
Pretty White Pumpkins & Make Your Own Pumpkin Pie Spice

I whipped these guys together in less than an hour using an old shower curtain! Aren't they beautiful? I'm so excited to start decorating for Halloween!

Now that we're into the fall season, so many recipes call for Pumpkin Pie Spice... A lot of people don't keep it on hand because it's so pricey, but it's very easy to make yourself! Plus, all the ingredients can be found at the dollar store and most likely they're in your cupboard already!
Pumpkin Pie Spice
1/4 c. cinnamon
1 T nutmeg
1 T ginger
1 1/2 tsp cloves
Mix together well.
Friday, August 31, 2012
Shabby Chic Bathroom Update
I love my shabby chic rooms! My bathroom may be small, but it's pretty!

Large glass jars ($1 each at a yard sale) and sticky chalkboard sheets ($1 on clearance at Michaels) combine to hold all the bathroom odds and ends in an organized way.

I picked this cupcake soap up in a boutique! It's so adorable!


The shower curtain is from Target. I love the prettiness of it.

Little feminine touches are everywhere.

The clock was a $1 thrift store find.

Large glass jars ($1 each at a yard sale) and sticky chalkboard sheets ($1 on clearance at Michaels) combine to hold all the bathroom odds and ends in an organized way.

I picked this cupcake soap up in a boutique! It's so adorable!


The shower curtain is from Target. I love the prettiness of it.

Little feminine touches are everywhere.

The clock was a $1 thrift store find.
Saturday, July 21, 2012
Farmhouse Chic Living Room Mini-Makeover

I am still totally in love with my all white Farmhouse Chic living room! It's been over a year and I still smile every time I walk through the front door. Last weekend I decided I needed to make a few changes though and I'm so happy with how they all turned out!

My brown piano was beautiful but too dark for a shabby chic home. I also had to take down my awesome vintage dairy strainer to make way for the piano and it hasn't had a home since.

This ceiling fan was not only ugly, it quit working last summer and then the kids broke one of the glass shades (with a devil's pitchfork... not even kidding). If you look in the bottom left corner you'll see a bit of the front door I never painted last year... not sure why.

The shades on this antique lamp didn't quite match the living room. They matched my couches pre-slipcovers. The flowers annoyed me and the mason jar lamp had a boring shade.

I ditched the shades and covered the cardboard with red and white scrapbook paper for an updated sleek look.

I covered the lamp shade with a 1939 sugar sack. I got rid of the flowers and contained the milk bottles to a vintage enamelware pan. One of the milk bottles was a recent find. It was the only one without a original label so I bought a red star sticker at Hobby Lobby to fill in.

I placed a vintage doily on the shelf. It was a recent .25 find. I replaced a bird with a vintage honey pot.

The picnic baskets used to be on the floor. I placed them on a white stool topped with another .25 doily. I'm not sure if the baskets really fit in... They may be too colorful. Thoughts?

I finally painted my front door and installed a milk glass light fixture! It looks so much better!

My giant dairy strainer found a home! This strainer is one of my favorite treasures!

I love my antique mason jar chandelier! I debated and debated on what kind of lights to use and then I decided I don't need lights! It was really easy to make! I spray painted a rusty old canner rack and some rusty canning lids white (they would have been great rusty too!) and picked out some of my oldest canning jars. The white chain and S hooks were pretty inexpensive at Home Depot. The whole chandelier cost me just a few bucks!

The milk glass chandelier was $5 at a yard sale. I love it a lot! It's so much better than the old brown ceiling fan!

My piano makes me so happy! I love it so much!


Saturday, July 14, 2012
Painted Piano
I was given a really fabulous antique piano by a woman in my ward. She wanted it to go to someone who would love it... Well, I LOVE it! I have been missing my old piano for quite a while so it's really nice to have one again!
This beauty is an upright grand from the 1800s! It just didn't quite match my all-white farmhouse chic living room...

Three coats of paint later it looks like this...

I am so in love with it! Plus, my living room feels balanced again! I'm trying to decide what kind of embellishment it needs because it seems a little plain... I'm sure I'll think of something! For now I'm really happy with it!

This beauty is an upright grand from the 1800s! It just didn't quite match my all-white farmhouse chic living room...

Three coats of paint later it looks like this...

I am so in love with it! Plus, my living room feels balanced again! I'm trying to decide what kind of embellishment it needs because it seems a little plain... I'm sure I'll think of something! For now I'm really happy with it!

Tuesday, January 31, 2012
Why Didn't I Think of This Sooner? Fun and Stylish Ring Holder


I didn't glue the rolls to the bottom of the shoes because yes, I do wear these heels on occasion! Aren't they fun? $5 at Rue 21, which is my favorite clothes store! These would make fun gifts for teenage girls! You could split up the pair, attach the rolls to the shoe to make it permanent and you've got a great gift for just a couple of bucks!
Think of the upcycling possibilities! Vintage looking heels that are too small to actually fit your modern feet could become great ring holders to sit on your vanity or dresser! You could dress them up with lace or all sorts of embellishments! Or if you like modern then grab those high heels you'd break your ankle in and make them useful!

Tuesday, January 17, 2012
Spice Shelf to Shadowbox Make-Over

During Christmas break while my kiddos were gone I decided I needed a crafting project. I hit DI (local thrift store) looking for a project. This is what I found for $3:

Pretty ugly, huh? The hardest part was removing the puff paint stained glass. It took about an hour to scrape it off the glass. I was so worried it would break. Once the glass was clean I painted the whole thing white and started looking around my house for little vintage goodies.

I think it came out fantastic! I LOVE vintage shadow boxes! I gave it to my mom for Christmas. I think she liked it!


I may become addicted to making shadowboxes! They are so much fun.
Subscribe to:
Posts (Atom)